Thursday, November 25, 2010

Banana Fritters


Banana fritters coated with icing sugar.

I made some banana fritters and the batter turned out to be quite nice with a lovely crunch. The batter was fairly easy to prepare. I used self-rising flour, eggs, water and some oil for the batter. The bananas on the other hand, were slightly unripe and the fritters did not turn out to be the way I expected. Lesson learnt: use ripe bananas for making fritters. Nevertheless, the batter was quite a success from this attempt.


Wednesday, November 24, 2010

Yaki Soba


I bought some soba noodles some time back and wanted to make cold soba with it. Unfortunately, I did not have the ingredients for that noodle dish and made Yaki Soba instead. ‘Yaki’ means grilled, broiled or pan-fried in Japanese while ‘Soba’ is a type of Japanese noodles made from buckwheat flour. This noodle dish is basically a stir-fry with meat and vegetables. I chose chicken meat, carrots, mushrooms and brown onions for my yaki soba and the combination of the ingredients went quite well. Although mildly flavoured, it was still a tasty dish.


Serve Yaki Soba while it is hot with chopped spring onions and nori strips.


Yaki Soba Recipe (serves 2)

Ingredients:
1 large chicken thigh (sliced thinly)
½ teaspoon salt
¼ teaspoon pepper
½ teaspoon corn flour
3 tablespoon soy sauce
3 teaspoon sugar
2 teaspoon sesame oil
180g of soba noodles
½ of a small brown onion (sliced)
1 small carrot (sliced thinly)
1 brown mushroom (sliced thinly)
1 egg (lightly beaten)
Spring onions (chopped)
Small piece of nori sheet (cut into small strips)


Procedure:
1. Marinate the chicken slices with salt, pepper, corn flour, 1 tablespoon of soy sauce and 1 teaspoon of sugar for at least an hour.

2. Bring a large saucepan of water to the boil. Add the soba noodles and cook for 1-2 minutes. Drain and rinse the noodles under cold water. Leave it for later use.

3. Mix the remaining soy sauce, sugar and sesame oil in a bowl.

4. Heat up a wok with some oil and stir-fry the chicken meat until lightly browned (do not overcook the meat). Remove it from the heat and leave it for later use.

5. Heat up some oil in the wok again and stir-fry the onions for a while before adding the carrots and mushrooms.

6. Add the cooked soba noodles, chicken meat and sauce mixture into the wok and combine well.

7. Make a well in the centre, pour in the beaten egg and cook for 1-2 minutes. As soon as the egg starts to set, stir though with the noddles.

8. Dish up the noddles and garnish it with the chopped spring onions and nori strips.


Monday, November 22, 2010

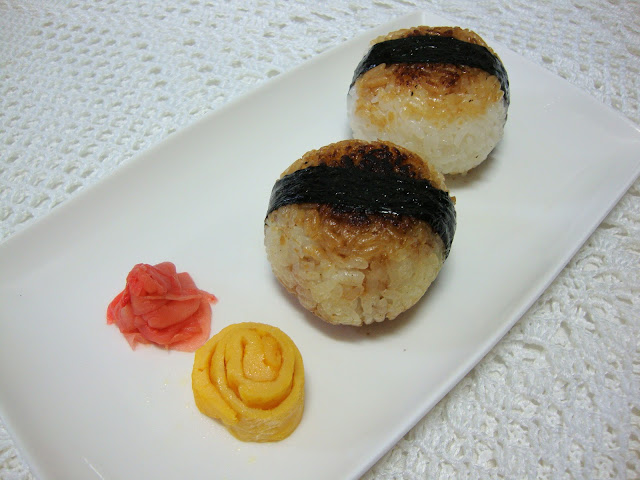
Yaki Onigiri (filled with Tamogoyaki)

Lightly pan-fried onigiri stuffed with tamogoyaki.

Yaki Onigiri are also known as Japanese grilled rice balls. Onigiri are made from white rice, shaped into triangular or oval shapes and usually wrapped with nori sheets (seaweed). Traditional onigiri are usually filled with pickled ingredients and is normally eaten as a quick snack. I once read that onigiri were popular in Japan as early as the 11th century. They were usually eaten during outdoor picnics, or wrapped in bamboo leaves by the Samurai as food that they could eat on the go. Since then, nothing has change much, and onigiri are still very popular in Japan, available as they are with various types of stuffing and in different flavours.

I was inspired to make my own onigiri after reading so much about it on the internet and in books. They taste great and make good main meals, side dishes or snacks. To make them, I used sushi rice and added a vinegar mixture (rice wine vinegar mixed with some sugar and salt) to the rice after it has been cooked. Once the rice had cooled, they were shaped into balls and stuffed with some tamogoyaki (slightly sweetened egg omelette) before pan-frying them lightly on a pan. For some added colour and flavour, I coated some Japanese soy sauce (I prefer this as it is less salty than Chinese soy sauce) on both sides of the onigiri while pan-frying them. You could also cut some strips of nori and wrap them around the onigiri as garnish.


Serve yaki onigiri while hot and with pickled ginger slices.


Onigiri that has been mixed with soy sauce before pan fried.

There is another similar recipe as the above but this time the cooked sushi rice is thoroughly mixed with some vinegar mixture and Japanese soy sauce before pan-frying them lightly. Once the rice has cooled down a little, shape the rice quickly into balls, stuff them with the tamogoyaki and wrap some slices of the nori around the onigiri. Onigiri are best eaten with pickled ginger slices. Oishii!!!


Tuesday, November 9, 2010

Chicken and Potatoes in Black Peppercorn Stew


I was just looking at some of my previous blog entries and realised that I have been cooking meat dishes using more chicken than other types of meat (Honey Baked Chicken Wings, Chicken Laksa, and Drunken Chicken in Spicy Dark Sauce). I have not really tried much dishes using seafood and I hope to cook tuna or salmon one of these days. I guess my favourite type of meat is still chicken. Yum! I was cooking this dish last night – Chicken and Potatoes in Black Peppercorn Stew and it turned out quite pleasant. So for now, another chicken dish to share!

 This is an all time childhood favourite from my mum’s kitchen. The ingredients for this stew are not extravagant and this is a dish that could be easily prepared. The taste is sweet, savoury (as a result of the slow cooking of the onions, carrots and chicken) and has a nice aroma from the peppercorns. As I said earlier, the ingredients for the stew are fairly common and the taste is nothing extraordinary. However, what I really like about this homely hot stew is the combination of sweet and savoury flavours over a bowl of warm rice.

 I have tried cooking and perfecting this stew several times so that it could matches my mum’s original recipe. The first few attempts were not so successfully, but after several trial and errors (cooking is after all a practice of patience), I managed to create something which is somewhat similar to my mum’s dish.


Chicken and Potatoes in Black Peppercorn Stew Recipe (serves 4-5 persons)


Ingredients:
1 teaspoon of grounded black pepper
4 tablespoons of light soy sauce
4 tablespoons of dark Soy sauce
Vegetable oil
2-3 large brown onions (chopped into small pieces)
½ tablespoon of black peppercorns (lightly crushed)
1 kg of chicken meat (boneless chicken thigh or drumsticks)
3 large potatoes (cut into quarter pieces)
3 medium sized carrots (cut into bite-sized pieces)
500ml of water
1 teaspoon of salt
Cornflour paste (mixture of 1 tablespoon of cornflour and 2 tablespoons of water)


Procedure:
1. Marinate the chicken meat with the grounded black pepper, 2 tablespoons each of light and dark soy sauces. Set the meat aside for an hour or longer. Keep the remaining light and dark soy sauces for later use.


2. Heat up some oil in a large wok or cooking pan. Add half of the onions and stir-fry in high heat for a while (be careful not to burn the onions).


3. Add the crushed black peppercorns and stir-fry them for a short while before adding the chicken meat into the wok. Brown the chicken meat lightly and do not overcook the meat. Remove the meat from the heat and set it aside.


4. Heat up some vegetable oil in the same wok and stir-fry the remaining onions in high heat for awhile. Add in the potatoes and carrots and stir-fry until fragrant.


5. Return the chicken meat into the wok and add in the water. Turn the heat to low-medium heat and simmer the mixture for an hour.


6. Stir the mixture occasionally to prevent the vegetables or meat from sticking at the bottom of the wok and to cook them more evenly. If the stew is boiling, reduce the heat to low and continue cooking. Add more water to the stew if it appears too dry.


7. After an hour, add the salt, cornflour paste, remaining light and dark soy sauces into the stew. Mix well and check if the meat and vegetables are cooked properly. Taste and adjust accordingly if you need to add more salt or soy sauce into the stew.


8. Bring the stew to a quick boil and remove from the heat. Dish the stew out and serve with warm rice.


Sunday, November 7, 2010

Pikelets with Butter and Jam


Pikelets are basically the smaller version of the usual pancake size. They tend to be very popular with children because they are bite-sized.

One of my friends introduced me to this cookbook called ‘Margaret Fulton’s Creative Cookery Course: A step-by-step guide for all occasions’. This book was written by Margaret Fulton and published in 1981. The recipes are very clearly explained, well illustrated and has instructions that are easy to follow. According to my friend, Margaret Fulton’s recipes were very popular in the 1970s and 1980s. This cookbook has definitely given me insight into Australian cuisine and lovely western home-cooked meals. This cookbook is highly recommended to anyone who wants a copy of good home-cooked western recipes.

All thanks to Margaret Fulton that I no longer need to rely on instant pancake mix. In my previous blog entry, I used a pancake recipe from the Coles Magazine. Comparing the two, Margaret Fulton’s pancake texture is more puffed and slightly cake-like. Personally, I think the taste is better too. Margaret Fulton uses a little lemon juice, butter and a pinch of salt in her pancake mixture. I think these are the keys to making well flavoured pancakes.

Making your own pancakes is not only quick and easy to prepare, they taste great too! It is also a great idea for parents who like to spend good bonding time with their children in the kitchen – they can prepare them together, and eat them with their favourite toppings (butter, jam, honey, fresh fruit, nuts or ice-cream). They are wonderful desserts for morning or afternoon teas.

Pikelets topped with butter and strawberry jam.

Pikelets Recipe (makes about 10-12) written by Margaret Fulton

Ingredients:
1 cup self-raising flour
Pinch of salt
¼ teaspoon bicarbonate of soda
2 tablespoons sugar
1 egg
½ cup milk with 1 teaspoon lemon juice added
15g butter (melted)
Extra butter for cooking
Extra butter and jam to serve


Procedure:
1. Sift the flour, salt and bicarbonate into a medium-sized bowl.

2. Make a well in the centre and add the sugar, egg, milk and melted butter. (I whisk the wet ingredients together before adding them into the flour mixture.)

3. Stir in the mixture from the centre gradually drawing in the flour from the sides, until you have a smooth batter.

4. Grease a non-stick frying pan with a little butter. Drop the mixture by tablespoonfuls into a pan and cook over medium heat until the bottoms are brown. Turn carefully and brown the other sides. (If the batter thickens too much, thin with a little milk.)

5. Serve the pikelets warm with butter and a good berry jam.


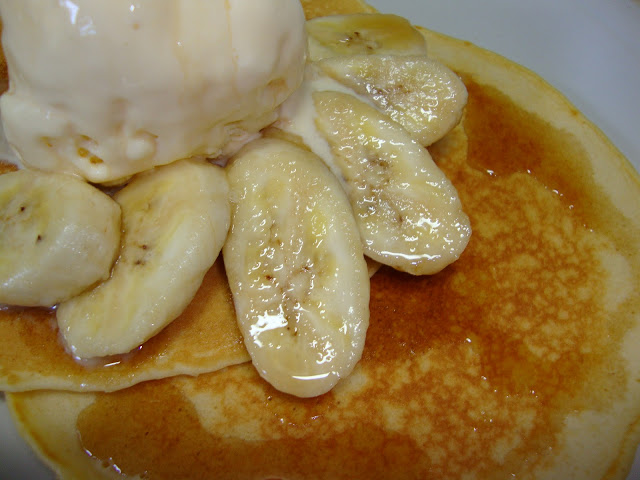
Pancakes with Banana and Ice-cream


This is a simple pancake recipe for those who like to have a quick and easy dessert (and not having to rely on pancake mix). It tastes great and can be topped with various yummy ingredients of your choice. I like mine with fresh bananas, vanilla ice-cream and maple syrup. This is a delicious combination for adults who have a sweet tooth but I wouldn’t recommend this to the children as they will most likely be bouncing off the walls from the high sugar levels. Personally, I think pancakes with nuts and fresh fruit will suit the children much better.

This pancake recipe was adapted from the Coles magazine. It was really easy to prepare but I find the texture of the pancakes to be slightly heavy. I prefer a softer and cake-like texture. Hopefully with more practice, I will be able to make my ideal pancake!


Pancakes topped with fresh bananas, vanilla ice-cream and maple syrup.

Pancake recipe (makes about 6)

Ingredients:
1 cup self-raising flour
1 tbsp caster sugar
¾ cup milk
1 egg
1tsp vanilla essence
Some butter for cooking
Bananas, vanilla ice-cream and maple syrup to serve


Procedure:
1. Sift the flour and sugar into a mixing bowl and make a well in the centre.

2. Whisk the milk, egg and vanilla essence together in a jar.

3. Pour the mixture into the dry ingredients in the mixing bowl and stir gently until combined.

4. Heat a large non-stick frying pan over medium heat and grease the pan well with some butter.

5. Spoon the mixture with a ladle and cook the pancakes on the pan until bubbles appear on the surface. Turn over the pancakes and cook until golden brown.

6. Serve the pancakes with bananas and vanilla ice-cream. Top it off with some maple syrup if you have a sweet tooth.


Tuesday, October 12, 2010

Mapo Tofu with Pork Belly

“People interested in lowering their cholesterol should probably acquire a taste for tofu…”
                                                                                                                          David Jenkins


Tofu has always been known to have high nutritional levels. It is an affordable ingredient, cooks well with most ingredients (such as meat and vegetables) and can be prepared in a variety of ways. It is probably one of the healthier ingredients to introduce into a young child’s diet.

‘Mapo Tofu with Pork Belly’ is a non-spicy tofu dish which was adapted from my favourite cookbook by Chen Kenichi. I substituted the minced beef in this dish with pork belly instead. According to Chen Kenichi, this dish is very suitable for children and adults who do not like spicy food. Despite this, the ingredients used in this adaptation are more extravagant compared to the usual version of Mapo Tofu (Chen, 2009).

Sunday, October 10, 2010

Honey Baked Chicken Wings

Honey baked chicken wings served with fresh tomatoes and lemon juice.

Cookbook by Iron Chef - Chen Kenichi.

Honey baked chicken wings is one of the recipes I have learnt from ‘Iron Chef Chen’s Knockout Chinese’ cookbook by Chen Kenichi. His cookbook includes recipes that incorporate a combination of Chinese and Japanese ingredients and cooking styles. He is my most favourite chef and his cookbook is a must have for those who love Chinese and Japanese food.

Honey Baked Chicken Wings (adapted from Chen Kenichi's cookbook).

This is a simple dish that reduces the hassle of cleaning and washing. All one needs to do is to marinate the chicken wings for at least 2 hours beforehand and bake them in an oven. I have improvised some of the ingredients for this dish as I do not have those as required in the cookbook. Nevertheless, the turnout was still great. The ingredients are: chicken wings; salt; rice vinegar; soy sauce; honey; and Chinese cooking wine (adjust according to your preference). Before baking, brush the baking tray with some vegetable oil and bake the chicken wings till they turn dark brown in colour. Squeeze some lemon juice on the chicken wings just before serving and they go very well as finger food or with rice.


Saturday, October 2, 2010

Macadamia and Cashew Nut Chocolate Muffins


This is another desert recipe that I learnt from the Coles magazine. This muffin recipe is very similar to the Chocolate-Lemon Muffins recipe in one of my earlier entries. The only difference in this muffin recipe is the use of macadamia and cashew nuts instead of lemon. The chocolate muffins go extremely well with vanilla ice-cream. It is a must try with the ice-cream! The chocolate flavour in the muffins complements well with the cold vanilla ice-cream and the nuts in the muffins give an overall nice crunch to the dessert.

Macadamia and cashew nut chocolate muffin served with vanilla ice-cream, chocolate sauce and crushed nuts.


Macadamia and Cashew Nut Chocolate Muffins Recipe (makes about 12)

Ingredients:
200g of butter (at room temperature, chopped)
200g of cooking chocolate (chopped)
1 cup of brown sugar (adjust according to your taste preference)
3 eggs (lightly beaten)
1 cup of roughly chopped macadamia and cashew nuts
1cup of self-raising flour
2 tbsp of cocoa powder
Some unchopped nuts as garnish

Procedure:
1. Preheat the oven to 180 degrees. Line a 12-hole muffin pan with paper cases.

2. Melt the butter and chocolate in a heat-proof bowl over a saucepan of simmering water, stirring until smooth. Add sugar and stir until dissolved. Remove from heat.

3. Add eggs and beat with a wooden spoon until well-combined.

4. Sift the flour and cocoa powder and fold into a mixture, until just combined.

5. Add the chopped nuts and stir gently into the mixture.

5. Fill the prepared muffin pan with the mixture and top each with the unchopped nuts.

6. Bake for 20-25 minutes, until a skewer inserted comes out clean. Cool on a wire rack.

Sunday, September 12, 2010

Grilled Steak with Rotini Pasta Salad


I had a simple dinner of steak with some salad with my husband last night. The steak was lightly grilled with some salt and pepper. The main invention however, was the pasta salad and it was quite a successful attempt as my husband enjoyed the side dish.

Salads are such a good way of complementing a meat dish. On top of that, they are healthy as they are made up of lots of fresh vegetables and usually do not require any form of oily cooking. Making salads are also very simple because you can use any type of ingredients that suits your palate. My husband and I are meat lovers so I usually like to add in a small amount of meat or protein in my salads. The ingredients in my pasta salad are: rotini pasta; sweet corn; cherry tomatoes; chives; bacon; mayonnaise; Heinz salad sauce; pepper and salt. In my opinion, it tastes better when served chilled as it is quite refreshing to eat on a warm day. The rotini pasta salad is easy to prepare and serves as an excellent side dish or packed lunch (since it consists of a well balanced diet of carbohydrates, fresh vegetables and some meat).

Tuesday, August 24, 2010

Vegetable Spring Rolls

This is one of my most favourite entrées. Although it can be quite time consuming to make (wrapping the spring rolls individually), the effort is not wasted when you pop these crispy hot rolls into your mouth. Health conscious people might shun these lovely crispy rolls but there are ways to make it ‘less unhealthy’:). I once read in a food magazine that frying food in less oil (i.e. just enough to cover the surface level of the food), using vegetable oil (such as canola oil) and making sure that the excess oil from the fried food has been drained properly (using kitchen towels), makes it LESS unhealthy. After all, we don’t eat fried food everyday and enjoying fried food once in a while can be pardonable. (I am a fried food fan…can’t keep away from such goodies for too long). Fresh vegetables are used as the filling in these spring rolls. This might encourage children to eat more vegetables.

I have tried a few types of spring roll wrappers and in my opinion, the best type of spring roll wrappers are still the ‘Spring Home – TYJ Spring Roll Pastry’ brand (manufactured in Singapore). The spring roll wrappers are much more flexible and easier to fold compared to some other brands. It does not break easily during the wrapping process and has this thin crispy texture after they are deep fried.


Recipe for Vegetable Spring Rolls (makes about 20 mini spring rolls):

Ingredients:
1 small slice of ginger
1 small glove of garlic (chopped finely)
½ of a small round cabbage
1 medium sized carrot
5 medium sized mushrooms
Light soy sauce
Pepper
Spring roll wrappers
Small cup of water
Cooking oil (preferably vegetable oil)


Procedure:
1. Wash and cut the vegetables (cabbage, carrot and mushrooms) into strips.

2. Add small amount of oil onto a pan and fry the ginger and garlic for a short while (till fragrant) before adding the cabbage, carrot and mushrooms. Cook the vegetables till they turn soft. Add about 1-2 tablespoons of water to the vegetables if they stick to the pan or look dry.

3. Add the light soy sauce and pepper to taste. Mix well.

4. Remove the cooked vegetables from the heat and cool to room temperature.

5. Once the vegetables have been cooled, remove the slice of ginger and wrap the rest of the vegetables with the spring roll wrappers. Brush the end tip of the spring roll wrappers with water. This is to ensure that the spring rolls do not open up while frying.

6. Fry the spring rolls in vegetable oil till they turn light golden brown in colour. Drain off the excess oil and serve while it’s hot.

Monday, August 23, 2010

Sambal Beef Noodles


I was wondering what to prepare for dinner with the left over beef from last night. I was thinking of doing a noodle stir-fry and happened to see the new jar of sambal sauce sitting in the fridge unopened. I decided to try something new this time round so I stir-fried the noodles with the sambal sauce.

The turn out was only average. Hopefully, there are nicer types of sambal sauces or paste around. This was the Yeo’s brand of sambal sauce and it was rather disappointing (I usually support home brand Singaporean products when residing overseas). I remembered one of my friends back in Singapore (Auntie Cecilia) used to make her own sambal chilli sauce and it was FANTASTIC!!! The homemade sauce was so good that I could even eat it with plain rice and lightly stir-fried vegetables.

This noodle dish works well especially when you have got to get rid of your leftovers. Beef, chicken, pork and even seafood such as prawns and squid go well with sambal. Add some fresh vegetables, eggs and lightly season the stir-fry with soy sauce and pepper. It is easy and quick to prepare.

Saturday, August 14, 2010

Korokke (Japanese Potato Croquette)


Korokke is one of my favourite Japanese entrées. The outer crust is slightly crispy with a lovely crunch. The potato filling on the other hand, is warm, moist and a little sweet. Totally love this starter! I have been wondering how to make this nibble, especially making the potato filling moist and sweet. I then remembered one of my friends (Rebecca Lam), once told me that cooking is not that difficult. To cook something which you have tasted before, you just have to recall the taste and ingredients used in that dish. In addition, you will probably require a few ‘trial and error’ attempts but the end result should be quite satisfying. This was how I came up with the recipe.

I tried making korokke twice with different ingredients for the filling. The ingredients for the first attempt were sweet corn, carrots, peas, some cream and milk. For the second attempt, I used sweet corn, carrots, bacon and milk instead. Personally, the korokke from the first attempt was much nicer. It was sweeter and slightly more moist compared to the second attempt.

The best part of this entree is that you only need some salt and pepper to season it lightly. You could also substitute your favourite types of vegetables or meat in the potato filling and adjust the quantity of the ingredients according to your taste. However, do take note that the potato mixture should not be too wet. This will cause the potato mixture to crumble and break apart during frying.

Tuesday, August 10, 2010

Chicken Laksa


I was craving for laksa and decided to try cooking it using the laksa spice paste (purchased from the NTUC supermarkets in Singapore). The taste of the laksa gravy was savoury and tasty but was not exactly what I expected...I was hoping to taste the ‘Singaporean-type’ of laksa (as indicated on the packaging of the laksa paste). The laksa gravy turned out to be slightly pale orange – yellow in colour. Perhaps I may have added slightly too much coconut cream. In any case, it was still a source of comfort food for someone who misses a spicy Asian rice noodle dish.


There were cooking instructions at the back of the laska paste sachets, but I added chopped onions, garlic, extra dried chilli and coriander flakes to give that extra spicy and South East Asian flavour to the dish.

Procedure:
1. Lightly season the chicken meat with salt and pepper.

2. Pan-fry the chicken meat thoroughly in cooking oil until it turns lightly browned (the meat should not be fully cooked as it will be cooked again in the spicy paste). Set aside the chicken meat.

3. Add oil in the wok and cook the chopped onions and garlic (for a short while) before adding the laksa paste and dried chilli flakes. Cook the laksa paste mixture till fragrant.

4. Add the pan-fried chicken meat back into the wok and mix well.

5. Add coconut cream, water and coriander flakes into the laksa mixture and bring to a boil before simmering for about 30 minutes in low heat.

6. While the laksa mixture is simmering, boil the rice noodles and prepare the hard boiled eggs, crabsticks and bean sprouts.

7. Once the laksa mixture is cooked, place some rice noodles, bean sprouts, hard boiled eggs and crabsticks into a bowl. Pour the hot laksa gravy with the chicken meat over the condiments and serve immediately.

Sunday, August 1, 2010

Banana Cupcakes


This is another cake recipe that I read from the food magazine from Coles Supermarket. It works rather well and it’s an easy-to-implement recipe for cupcake lovers. The recipe uses ingredients such as bananas and fresh milk (note however that I substituted buttermilk in the recipe with fresh milk) and the fat content is at a relatively low level. It does not require food colouring or artificial flavouring etc. so this recipe would suit health conscious cake lovers as well as children who should be eating fresh fruits.


Banana Cupcakes Recipe (makes about 9)


Ingredients:
¾ cup of plain flour
1½ tsp of baking powder
¼ tsp of bicarbonate of soda
½ cup of mashed banana, plus 9 thin slices of banana
¾ cup of caster sugar
1 egg
60g of butter, chopped at room temperature
¼ cup of buttermilk (or ¼ cup of milk mix with 2 tsp of baking powder)

Procedure:
1. Preheat the oven to 180 degrees. Line 9 x 1/3-cup holes of a muffin pan with paper cases.

2. Sift flour, baking powder and bicarbonate powder together.

3. Place banana, sugar and egg into a food processor. Process until smooth. Add butter and process until mixture is creamy. Add buttermilk and pulse until just combined. Add flour mixture and pulse until batter just comes together, do not over mix. Transfer to a bowl.

4. Using a ¼ cup measurement, fill the prepared muffin pan. Top each cupcake with a slice of banana.

5. Bake for 20-25 minutes, until they spring back when touched. Cool in pan.

Saturday, July 24, 2010

Drunken Chicken in Spicy Dark Sauce


I missed the soy poached chicken sold in Singapore : ( so I decided to cook something similar but included an additional spicy punch to the dish. I chose to name my dish drunken chicken because the meat has been cooked in a considerable amount of shaoxing wine and the meat indeed looked kind of ‘drunk’ when soaked in the wine mixture. The other essential ingredients such as ginger, red chillies and dark soy sauce gave the dish its spiciness and colour to the sauce.

The dish tasted quite pleasant but still needs a lot of improvement. It will be wonderful if I could create a stronger pleasing aftertaste in the chicken meat so that it stays in the mouth longer. Perhaps I missed out certain ingredients when the meat was marinated. A few more trial and error ‘experiments’ will probably enhance the dish and hopefully by then, I will have a more precise recipe for this chicken dish. Please stay tuned for further developments! ; )

Stir-Fry Chinese Cabbage with Carrots


I was so glad when I noticed the variety of Asian vegetables sold in the supermarkets in Townsville. Chinese celery cabbage (also known as ‘wombok’ in Australia), Chinese white cabbage (also known as bok choy or bai cai), Chinese flowering cabbage (also known as choy sum or cai xin), water spinach (also known as kangkong) and bean sprouts etc. can be easily purchased in the supermarkets here. I was pleased with the wide selection of fresh Asian produce here because this meant that I would get to use these vegetables in my cooking.

Chinese celery cabbage is one of my favourite vegetables. They are sweet and mild-flavoured and taste fabulous in stir-frys or in soups. Simply add some ginger and garlic and stir-fry the cabbage with some carrots. They make a quick and easy-to-prepare dish.

Friday, July 23, 2010

Spaghetti with Spicy Beef Sausages


I am not a pasta lover but my husband simply fancies it, especially the tomato based type of pasta. Italian food is definitely not my cup of tea and the last time I made any pasta was years back using the ready made pasta sauce in those glass jars. This time, I decided not to use those instant pasta sauces sold in the supermarkets. One of my friends suggested that I should use fresh herbs in my pasta. She told me that the Italians use fresh basil leaves in their pasta and that is the key to making very aromatic sauces. I am not sure if this is true but my pasta sauce for this evening’s dinner did turn out quite well with an exceptionally lovely scented flavour.

This dish is fairly simple to prepare, particularly for pasta lovers who prefer a home cooked meal. The taste is light and mild for those who do not like an overly rich type of pasta sauce. The best part of preparing a pasta dish is that you can select any type of meat that suits your palate. Whether it is beef, chicken or pork (minced or chunks), they all go well in most tomato based pasta.


Recipe for Spaghetti with Spicy Beef Sausages (serves 3-4 persons):

Ingredients:
Oil for cooking
Spicy beef sausages
1 large onion (finely chopped)
Bacon pieces (diced)
4 tomatoes (diced)
1 can of condensed tomato soup
250ml of water
Basil leaves (fresh, roughly diced)
Oregano leaves (fresh, roughly diced)
400g of spaghetti
Cheddar cheese (grated)
Parsley (fresh, roughly diced)
Salt
Pepper

Procedure:
1. Heat up a pan and grease well with some oil. Pan-fry the sausages thoroughly. Set aside for later use.

2. Heat up the pan again. Grease the pan well with the cooking oil. Add the chopped onions. Cook them till they turn slightly translucent in colour and fragrant. Add the diced bacon and tomatoes and cook for another 3-5 minutes.

3. Add the tomato soup and water. Stir well and add the basil and oregano leaves into the tomato mixture. Bring to a boil and then reduce to low heat to simmer for about 30 minutes. Stir occasionally.

4. While the tomato mixture is being cooked, prepare the spaghetti. Boil a large pot of water. Add some salt and oil into the water. Add the spaghetti into the boiling water and remove from the pot once it is cooked. Drain the spaghetti.

5. Return to the pasta sauce. Add the cooked sausages and grated cheddar cheese into the tomato mixture and cook for another 5 minutes. Stir well so that the tomato mixture is well mixed.

6.  Add the fresh parsley, salt and pepper into the tomato mixture according to your taste.

7. Remove from heat and serve with the cooked spaghetti.

Wednesday, July 21, 2010

Chocolate-Lemon Muffins


This was my first baking attempt without using any easy-to-implement cake mix formula from the supermarkets. I had very bad experiences with baking in the past. The last time I baked any cakes was probably about 7 years ago. The cakes I baked either sank in the middle, ended up in a weird shape or had a horrible texture. I was very happy that I overcome my baking ‘phobia’ and tried this out. Because of this experience, I am definitely going to try out more baking recipes. Yeah!

This recipe was adapted from one of the food magazine series from the Coles Supermarket. I am really impressed with the number and variety of simple recipes in such magazines. The recipes not only work but are very useful to amateur cooks like myself. Best of all, these magazines are FREE copies!!! :)

One of the main ingredients for this recipe is orange. However, I did not have any of this fruit when I tried out this recipe so I substituted it with lemon instead. The muffins have a very rich chocolate flavour and they are well complemented with the citrus taste of the fruit. Be careful not to over bake the muffins as this may cause the cakes to have a bitter base and a dry texture. Baking exactly between 20-25 minutes in the oven (please refer to the recipe), is the perfect baking duration for these muffins.


Chocolate-Lemon Muffins Recipe (makes about 12)

Ingredients:
175g of butter (at room temperature, chopped)
175g of dark chocolate (chopped)
1 cup of brown sugar
3 eggs (lightly beaten)
½ lemon (juice)
1cup of self-raising flour
2 tbsp of cocoa powder
12 small pieces of lemon slices

Procedure:
1. Preheat the oven to 180 degrees. Line a 12-hole muffin pan with paper cases.

2. Melt the butter and chocolate in a heat-proof bowl over a saucepan of simmering water, stirring until smooth. Add sugar and stir until dissolved. Remove from heat.

3. Add eggs and lemon juice. Beat with a wooden spoon until well-combined.

4. Sift the flour and cocoa powder and fold into a mixture, until just combined.

5. Fill the prepared muffin pan with the mixture and top each with a lemon slice.

6. Bake for 20-25 minutes, until a skewer inserted comes out clean. Cool on a wire rack.